How to Take Care of Tarantula Eggs, Artificial and Natural Way

If you have a tarantula and have wondered how to take care of her eggs, both naturally and artificially, in this article we will be addressing this issue.
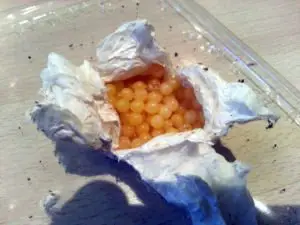
If the mating is successful and the necessary climatic conditions have been introduced at the right time, the tarantula, with a little luck, will have built a cocoon, This is a rounded silk layer that serves to protect the eggs.
At this stage it is particularly important that the tarantula is disturbed as little as possible. All work on the terrarium should be kept to the absolute minimum. The animals need a lot of rest at this stage. Everyone has heard of tarantulas eating their cocoons for some inexplicable reason. The reasons for this are unknown.
Every ambitious tarantula breeder tries to prevent this situation. Therefore you should be particularly careful with your animals now. If the terrarium is part of a standard system with other terrariums, it makes sense to put the female’s terrarium in a quiet place. Fiddling with the other terrariums causes vibrations that could possibly disturb the female.
A soft towel or anti-slip mats under the terrarium transmit fewer ambient vibrations to the terrarium. However, the change in the location must not change parameters such as temperature or humidity.
Even bright light can be perceived as annoying by the tarantula, so the terrarium can be covered with a towel. Feed does not have to be served in this phase.
You now have the option to leave the cocoon with the female and simply wait until the first small tarantulas in the first nymph stage appear in the terrarium. The tarantula does all the work and takes care of the cocoon. There are some breeders who do exactly the same and are successful with it.
Artificial cocoon construction to take care of the eggs
Another option, one I personally support, is to remove the cocoon from the female at an early stage and then develop it artificially. This path is a little more laborious for the caretaker, but he will be rewarded with an extremely interesting view of the individual stages of development until the tarantula is finished.
At least 5 weeks after the cocoon is discovered, it is removed from the female. As a rule, the eggs molt into the prelarve stage by week 6 at the latest. From this stage onwards, artificial timing is not a problem.
If there are still eggs in the cocoon, you shouldn’t worry. The molt into the pre-larval stage will probably follow in the next few days.
Caution should be exercised when removing the cocoon from the female. Understandably, the tarantula does not react with pleasure to this intervention. Often they hold the cocoon with their chelicerae so that the spider first has to be distracted with tweezers or something else and then quickly grabs the cocoon at the right time.
Once you have the cocoon, you can put it aside for a short moment and bring the mother’s terrarium back to its original state. This is a very stressful situation for the tarantula and it will look for the cocoon after it has been removed. A few hours later the animal has calmed down and stops looking. The females are fed again on the second day after the cocoons have been removed.
The tarantula will be very skinny, because the development of the eggs and the maintenance of the cocoon cost a lot of substance. This can be repeated a few days later until the abdomen has reached an appropriate size.
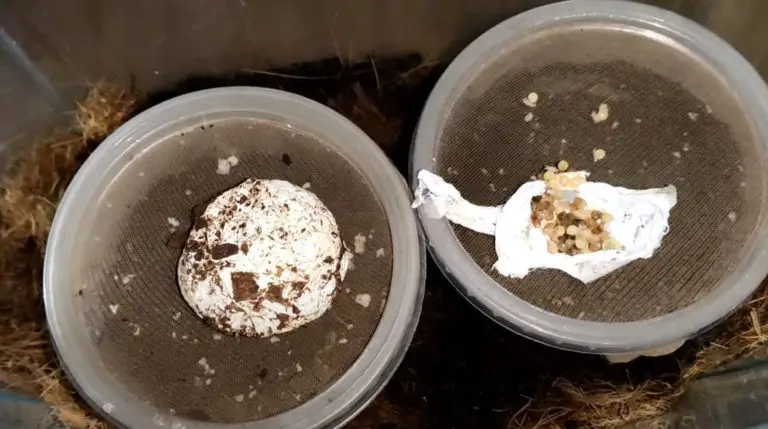
A commercially available 5.8 liter hard plastic jar is suitable as an incubator. Fine vermiculite is used as a soil substrate. It stores moisture excellently and despite the high humidity, no fungus of any kind develops.
Approximately 100 ml water is poured evenly over the vermiculite. A second small container serves as a shelf for the eggs or prelarvae. For example, a well rinsed can of coleslaw.
Ordinary nylon tights are stretched over this box, without the lid, and fastened in such a way that the tension is maintained. The excess nylon tights are simply cut off. The lid of the can is cut open in the middle or worked with a soldering iron, so that mainly only the edge of the lid remains. The lid comes back on the can after the nylon stocking has been fixed. This container is filled to a third with water and comes into the jar tin with the damp vermiculite.
The nylon is dried beforehand with a kitchen towel. The smaller container serves as a storage area for the prelarvae. Due to the water in the container, the humidity can easily reach the prelarvae via the nylon stocking without them getting wet. In addition, just like vermiculite, nylon has the property that no mold can develop on it despite high humidity. Now the incubator is practically finished.
The smaller container serves as a storage area for the prelarvae. Due to the water in the container, the humidity can easily reach the prelarvae via the nylon stocking without them getting wet. In addition, just like vermiculite, nylon has the property that no mold can develop on it despite high humidity. Now the incubator is practically finished. The smaller container serves as a storage area for the prelarvae.
Due to the water in the container, the humidity can easily reach the prelarvae via the nylon stocking without them getting wet. In addition, just like vermiculite, nylon has the property that no mold can develop on it despite high humidity. Now the incubator is practically finished.
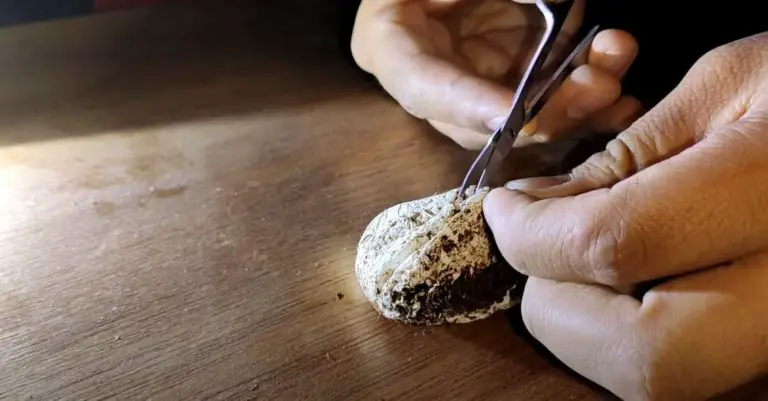
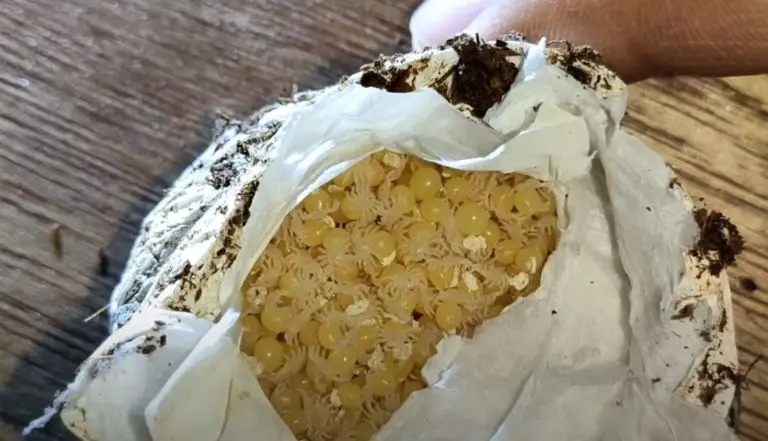
The cocoon can be carefully cut open with small scissors. The pre-larvae are carefully distributed on the shelf. Black eggs and moults are carefully removed with tweezers. Now the lid of the BraPlast can is put on and sealed airtight with masking tape. The masking prevents any insects such as humpback and fruit flies from getting into the container. Now the container can be placed in a warm place where it is around 25 degrees.
Near a radiator is an ideal location. Approx. A distance of 40 cm is sufficient. The incubator should only feel very slightly warm on one side. If this is not available because the radiators are off, a small heating mat can be installed on the container. 5 watts are sufficient. Finally, the container must be darkened with a towel, as the eggs / prelarvae / larvae do not like light.
From now on the biggest task is to be patient. The container is opened briefly daily or every other day so that some fresh air can come in. The vermiculite can be moistened a little again every two weeks. This procedure can be continued until the end of the larval stage. During this time, the future tarantulas do not need food.
This procedure can be continued until the end of the larval stage. During this time, the future tarantulas do not need food. This procedure can be continued until the end of the larval stage. During this time, the future tarantulas do not need food.
I remind you that the egg goes through four different stages, the first being the egg stage, the second prelarve, third larva, and the fourth and final nymph stage.